The payment gateway provides the option to use an iframe to seamlessly integrate the payment pages into your website, allowing your customers to make payments without leaving your site.
Using the iframe mode requires the merchant website to use the HTTPS protocol on all of its pages. This is necessary to ensure secure communication between the merchant's website and the Nilon gateway, providing a safe environment for processing payment transactions.
If you want to customize the checkout experience while maintaining PCI compliance, it is recommended to use the iFrame payment form. This approach allows you to embed the payment form within your website using an iFrame, providing a seamless and secure payment experience for your customers while reducing your PCI compliance scope.
Enable Plug in
- Login to Virtual Terminal
- Navigate to Settings and click on "Plugin"
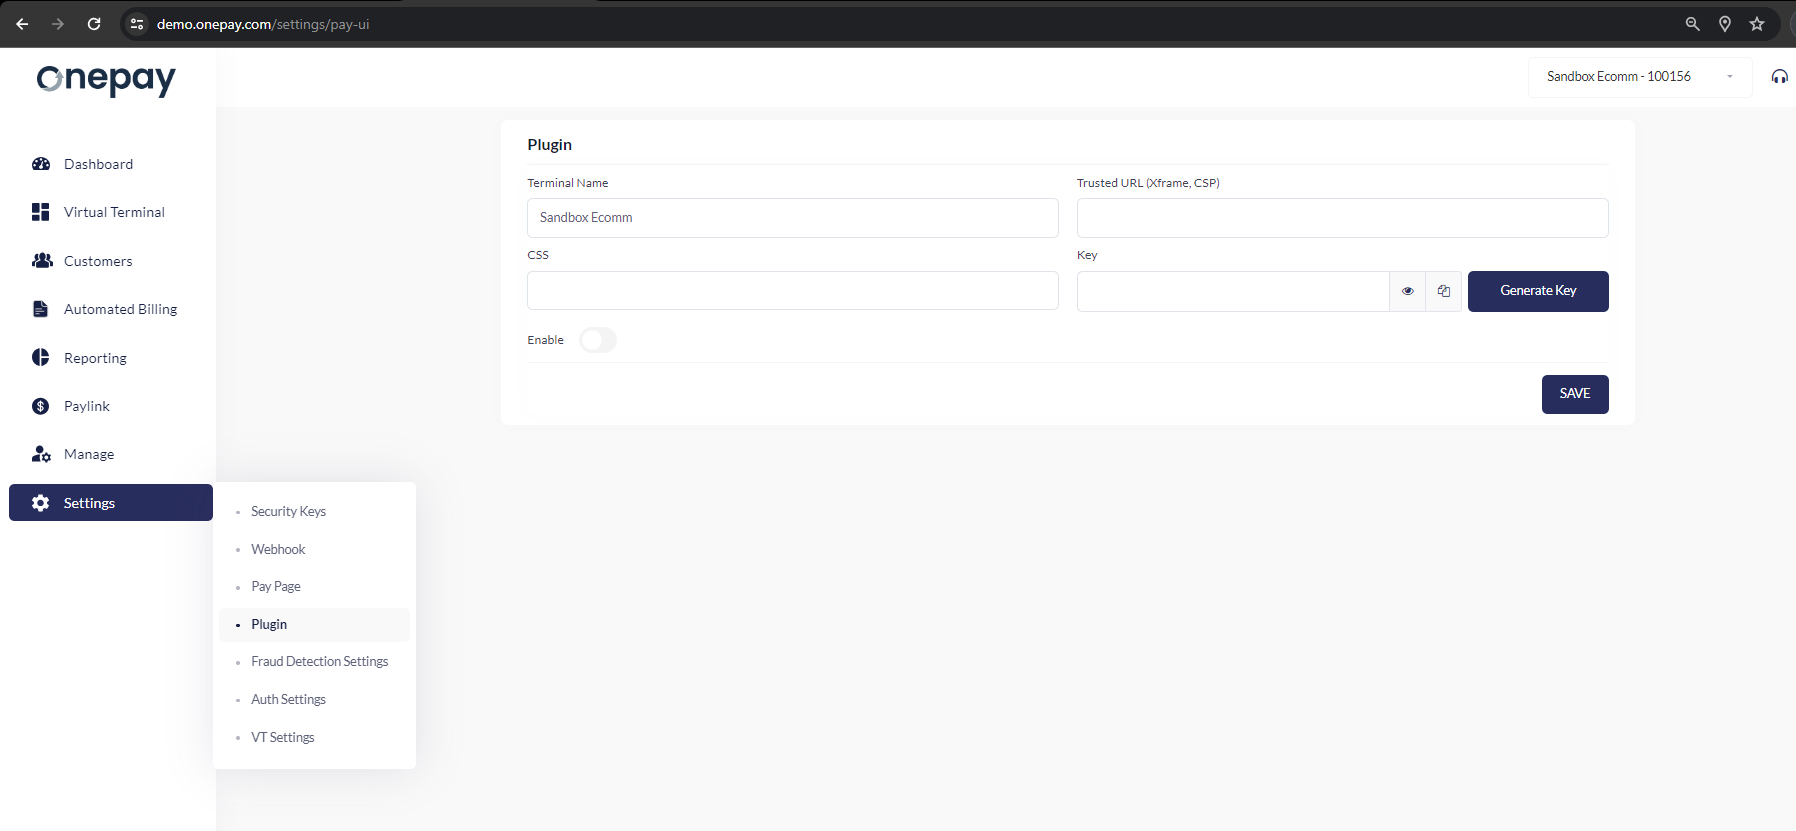
Trusted URL - In production, you should set the allowed URLs for the iFrame to ensure that it can only be activated from the intended websites. You can separate multiple domains using commas. Ex: https://www.yourdomain.com , https://subdomain.yourdomain.com
CSS -The Style Sheet URL field is used to specify the URL of the style sheet to be used for the payment form, if the style is based on the generic Nilon style sheet. If the payment form is enabled with overriding CSS while invoking, the style sheet specified here will be ignored.
Key - The key that will be generated by Nilon to be used as authentication key to authenticate the Iframe is a unique token that is used to verify the authenticity of the payment form and ensure that it is being accessed from a trusted source.
Account type- The account type checkboxes allow the merchant to select which payment options they want to offer to their customers. They can choose to display Credit Card or ACH or both as available payment options on the iFrame.
URL used for
CSS Reference -
Embedding Plugin
The simple integration uses _<script>_ tag that must be added inside your payment _<form>_ tag. That script tag is replace with payment button that will open Plugin when clicked. After successful payment function the results will be added to surrounding <form> as hidden <input> tags
<form action="/your-payment-handler" method="post">
 <script id="scriptIframe" type="text/javascript" src="https://apidemo.nilon.com/payui/nilon_V2.0.js"
            data-token="b11ed156d1e140a595ff513388cacde1"
            data-key="0D75E6A9-B83D-00A3-BFAB-1E1488CCE8A2"
            data-header="Token"
            data-amount="0"
            data-displayMode="popup"
            data-mode="token"
            >
    </script>
  </form>
Configuration parameters
These parameters can be added to your <script> tag to configure Pay UI parameters.
Mandatory Field
| Parameter | Description |
|---|---|
| data-key* | The key generated by Nilon to authenticate Pay UI |
| data-mode* | Accepted values: token, payment token : will set the mode of the Pay UI for tokenization only payment: will set the mode of the Pay UI for payment |
| data-displayMode* | Accepted values: popup, inline popup: will create a modal popup of the UI in a parent page inline: will create a inline content within the parent page |
| data-css | URL of the stylesheet to be used by Pay UI |
| data-token | token value to be updated by the Pay UI |
| data-header | Header text to be displayed |
| data-amount | Amount for payment if data-mode is payment |
Optional Field
| Parameter | Description |
|---|---|
| data-firstname | Add parameter to enter First name field on the UI |
| data-lastname | Add parameter to enter Last name field on the UI |
| data-city | Add parameter to enter City field on the UI |
| data-address | Add parameter to enter Address field on the UI |
| data-state | Add parameter to enter State field on the UI |
| data-zipcode | Add parameter to enter Zip Code field on the UI |
| data-email | Add parameter to enter Email field on the UI |
Javascript Payment Method:
When data-mode is payment in the script tag -
function MakePayment(header, amount, customerId, divIdCheckout)
You should call this above method in your webpage for Nilon response.
header: display title name for popup
amount: Configurable to set an amount to make a payment. This can be left empty if amount is entered on the webpage.
customerId: If customer id needs to be passed, for payment to the customer, mention id. This field can be left empty.
divIdCheckout: This is the id to be passed as a string, to render checkout in particular div element when data- displayMode="inline". For popup display mode, this value can left empty.
Example HTML:
<!DOCTYPE html>
<!--Sample HTML-->
<html lang="en" xmlns="http://www.w3.org/1999/xhtml">
<head>
    <meta charset="utf-8" />
    <title></title>
    <script>
 /* Step 3: Invoke functions to call onepay methods*/
        function checkout() {
            let amount = document.getElementById("txtAmt").value;
            MakePayment('test', amount, '', "divIdCheckout")
        }
        function addtoken() {
            AddCard("token", "divIFrameId", '')
        }
        function edittoken() {
            let token = document.getElementById("txttoken").value;
            EditCard("token",token, "divIFrameId", '')
        }
    </script>
</head>

<body>
    <!--Step 1: Insert Script tags-->
    <!--Use the URL of the js file provided by OnePay
        Setup data tags as required-->
    <script id="scriptIframe" type="text/javascript" src="https://apidev.onepay.com/payui/onepay_V1.0.js"
            data-key="0885CCB4-9C2C-086A-1B07-83036A3AA73F"
            data-mode="token"
            data-displayMode="popup"
            data-header=""></script>
    <div id="divIdCheckout">
    </div>
    <div id="divIFrameId">
    </div>
    <input id="onepayResult" type="hidden" />
    <input id="onepayToken" type="hidden" />
    <!--Step 2: Call input fields and buttons -->
    <p>Enter the amount to pay </p>
    <input type="text" id="txtAmt" value="" placeholder="Amount" maxlength="12" style="width:110px" />
    <button onclick="checkout()"> Payment</button>
    <br /><br />
    <p>Click below to save a new card on file </p>
    <button onclick="addtoken()"> Add card </button>
    <br /><br />
    <p>Enter token to edit an existing card on file  </p>
    <input type="text" id="txttoken" value="" placeholder="token" maxlength="100" style="width:110px" />
    <button onclick="edittoken()"> Edit card </button>
</body>
</html>